David has been a radio enthusiast since he was a kid, and was wrestling with a DAB radio in his kitchen with spotty reception.
“I thought it might be time to replace this radio and started to wonder if I could build my own connected to the internet,” David explains. “I know this can easily be achieved using a smart speaker setup, but I wanted a radio that just played radio stations. In support of the United Nations sustainable development goal which aims for sustainable consumption, I decided to reuse a traditional radio and build my own system inside it.”
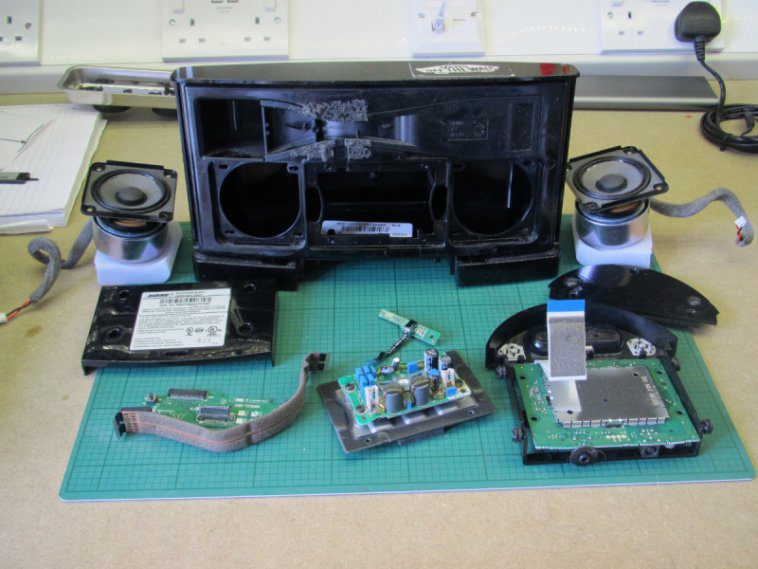
On David’s search for a suitable radio housing, he came across old BOSE SoundDocks (from the days where iPod docks were all the rage) which were listed as faulty.
“I suspected that these devices fail from the repeated insertion of the iPod into the docking connector,” David said. “But as I was not going to use that, it would seem a good option to use as the base for my project.”
Replacing iPod

Like a lot of upcycling projects, David went with a familiar solution: “I decided to use a Raspberry Pi Zero W for this project as it had plenty of processing power for the task and a very small physical footprint which could fit inside the case with ease.”
He decided to use a full-on DAC to provide the audio he needed from his Raspberry Pi Zero, delivering audio quality higher than internet radio could ever deliver. After removing the internals of the BOSE system, he found a good space to mount Raspberry Pi Zero and other components using a custom cradle designed in FreeCAD. He also added a small class D amplifier and installed an adapter so he could use a 5 volt power supply.
Out of a choice of music player and radio software for Raspberry Pi, David decided to keep it simple. “As the radio was not going to use a screen of any kind, I downloaded the latest version of Raspbian [Raspberry Pi OS] Buster Lite and installed it on an SD card,” he says. “All the installation was done through the command line. I installed the music player daemon and music player client which allowed me to check that the hardware was able to play the music stream.”
He added remote control abilities, programmed in specific stations, and was done.
Final touches

Well, nearly. David decided to go a few steps further with a custom fascia with an updated logo.
“Although this front fascia was now complete, I decided to experiment with the style of it,” he tells us. “I started with an understated panel with embossed letters, but then thought the wording should be highlighted as a feature. This was achieved with some enamel paint to fill the depressions made by the letters. A test piece revealed that the enamel paint was being drawn up along the filaments of PLA printer thread by capillary action. This was solved by first sealing the whole face with a clear acrylic spray, then painting the detail, finishing with some wet and dry paper on the top surface. A final coat of acrylic spray provided the finishing touch of a gloss surface to match the rest of the speaker body. I give you the BOSEBerry Pi.”