In this tutorial from HackSpace magazine issue 9, Paul Freeman-Powell shows you how to keep track of your social media followers, and encourage subscribers, by building a live follower counter. Get your copy of HackSpace magazine in stores now, or download it as a free PDF here.
Issues 10 of HackSpace magazine is available online and in stores from tomorrow!
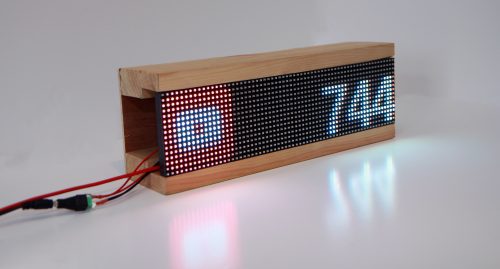
The finished build with all components connected, working, and installed in the frame ready for hanging on the wall
If you run a local business like an electronics shop or a café, or if you just want to grow your online following and influence, this project is a fun way to help you keep track of your progress. A counter could also help contribute to growing your following if you hang it on the wall and actively ask your customers to like/follow you to see the numbers go up!
You’ve probably seen those social media follower counters that feature mechanical splitflap displays. In this project we’ll build a counter powered by RGB LEDs that scrolls through four social profiles, using APIs to pull the number of followers for each account. I’m using YouTube, Twitter, Facebook, and Instagram; you can, of course, tailor the project to your needs.
This project involves a bit of electronics, a bit of software coding, and a bit of woodwork, as well as some fairly advanced display work as we transfer a small portion of the Raspberry Pi’s HDMI output onto the LED matrices.
Let’s get social
First, you need to get your Raspberry Pi all set up and talking to the social networks that you’re going to display. Usually, it’s advisable to install Raspbian without any graphical user interface (GUI) for most electronics projects, but in this case you’ll be actively using that GUI, so make sure you start with a fresh and up-to-date installation of full-fat Raspbian.
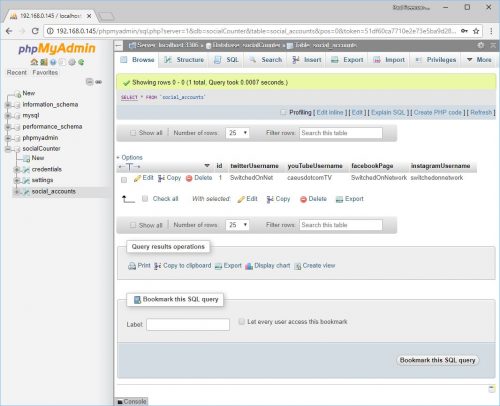
phpMyAdmin gives you an easy web interface to allow you to access and edit the device’s settings – for example, speed and direction of scrolling, API credentials, and the social network accounts to monitor
You start by turning your humble little Raspberry Pi into your very own mini web server, which will gather your credentials, talk to the social networks, and display the follower counts. To do this, you need to install a LAMP (Linux, Apache, MySQL, PHP) stack. Start by installing the Apache web server by opening a Terminal and typing:
sudo apt-get install apache2 -y
Then, open the web browser on your Pi and type http://localhost — you will see a default page telling you that Apache is working. The page on our little ‘website’ will use code written in the PHP language, so install that by returning to your Terminal and typing:
sudo apt-get install php -y
Once that’s complete, restart Apache:
sudo service apache2 restart
Next, you’ll install the database to store your credentials, settings, and the handles of the social accounts to track. This is done with the following command in your Terminal:
sudo apt-get install mysql-server php-mysql -y
To set a root password for your database, type the following command and follow the on-screen instructions:
sudo mysql_secure_installation
Restart Apache again. Then, for easier management of the database, I recommend installing phpMyAdmin:
sudo apt-get install phpMyAdmin -y
At this point, it’s a good idea to connect your Pi to a WiFi network, unless you’re going to be running a network cable to it. Either way, it’s useful to have SSH enabled and to know its IP address so we can access it remotely. Type the following to access Pi settings and enable SSH:
sudo raspi-config
To determine your Pi’s IP address (which will likely be something like 192.168.0.xxx), type either of the following two commands:
ifconfig # this gives you lots of extra infohostname -I # this gives you less info, but all we need in this case
Now that SSH is enabled and you know the LAN IP address of the Pi, you can use PuTTY to connect to it from another computer for the rest of your work. The keyboard, mouse, and monitor can now be unplugged from the Raspberry Pi.
Social media monitor
To set up the database, type http://XXX/ phpmyadmin (where XXX is your Pi’s IP address) and log in as root with the password you set previously. Head to the User Accounts section and create a new user called socialCounter.
You can now download the first bit of code for this project by running this in your Terminal window:
cd /var/www/html
sudo apt-get update
sudo apt-get install git -y
sudo git clone https://github.com/paulfp/social- media-counter.git
Next, open up the db.php script and edit it to include the password you set when creating the socialCounter user:
cd ./social-media-counter
sudo nano db.php
The database, including tables and settings, is contained in the socialCounter.sql file; this can be imported either via the Terminal or via phpMyAdmin, then open up the credentials table. To retrieve the subscriber count, YouTube requires a Google API key, so go to console.cloud.google.com and create a new Project (call it anything you like). From the left-hand menu, select ‘APIs & Services’, followed by ‘Library’ and search for the YouTube Data API and enable it. Then go to the ‘Credentials’ tab and create an API key that you can then paste into the ‘googleApiKey’ database field.
Facebook requires you to create an app at developers.facebook.com, after which you can paste the details into the facebookAppId and facebookSecret fields. Unfortunately, due to recent scandals surrounding clandestine misuse of personal data on Facebook, you’ll need to submit your app for review and approval before it will work.
The ‘social_accounts’ table is where you enter the user names for the social networks you want to monitor, so replace those with your own and then open a new tab and navigate to http://XXX/socialmedia-counter. You should now see a black page with a tiny carousel showing the social media icons plus follower counts next to each one. The reason it’s so small is because it’s a 64×16 pixel portion of the screen that we’ll be displaying on our 64×16 LED boards.
GPIO pins to LED display
Now that you have your social network follower counts being grabbed and displayed, it’s time to get that to display on our screens. The first step is to wire them up with the DuPont jumper cables from the Raspberry Pi’s GPIO pins to the connection on the first board. This is quite fiddly, but there’s an excellent guide and diagram on GitHub within Henner Zeller’s library that we’ll be using later, so head to hsmag.cc/PLyRcK and refer to wiring.md.
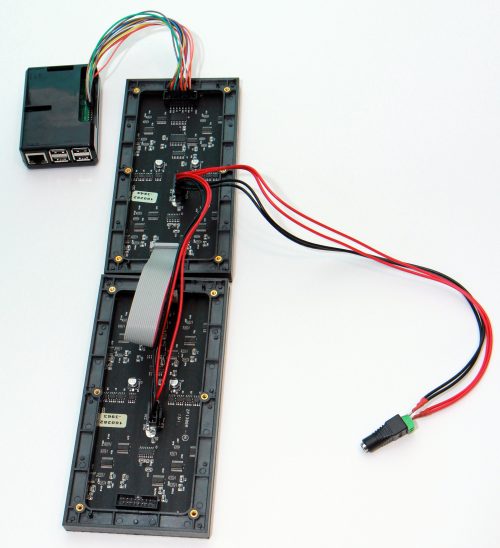
The Raspberry Pi connects to the RGB LED screens with 14 jumper cables, and the screens are daisy-chained together with a ribbon cable
The second screen is daisy-chained to the first one with the ribbon cable, and the power connector that comes with the screens will plug into both panels. Once you’re done, your setup should look just like the picture on this page.
To display the Pi’s HDMI output on the LED screens, install Adafruit’s rpi-fb-matrix library (which in turn uses Henner Zeller’s library to address the panels) by typing the following commands:
sudo apt-get install -y build-essential libconfig++-dev
cd ~
git clone --recursive https://github.com/ adafruit/rpi-fb-matrix.git
cd rpi-fb-matrix
Next, you must define your wiring as regular. Type the following to edit the Makefile:
nano Makefile
Look for the HARDWARE_DESC= property and ensure the line looks like this: export HARDWARE_DESC=regular before saving and exiting nano. You’re now ready to compile the code, so type this and then sit back and watch the output:
make clean all
Once that’s done, there are a few more settings to change in the matrix configuration file, so open that up:
nano matrix.cfg
You need to make several changes in here, depending on your setup:
- Change display_width to 64 and display_height to 16
- Set panel_width to 32 and panel_height to 16
- Set chain_length to 2
- Set parallel_count to 1
The panel array should look like this:
panels = (
 ( { order = 1; rotate = 0; }, { order = 0; rotate = 0; } )
)
Uncomment the crop_origin = (0, 0) line to tell the tool that we don’t want to squish the entire display onto our screens, just an equivalent portion starting right in the top left of the display. Press CTRL+X, then Y, then ENTER to save and exit.
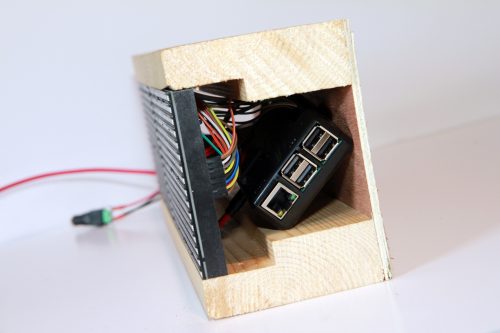
It ain’t pretty…but it’s out of sight. The Raspberry Pi plus the power supply for the screens fit nice and neatly behind the screens. I left each end open to allow airflow
Finally, before you can test the output, there are some other important settings you need to change first, so open up the Raspberry Pi’s boot configuration as follows:
sudo nano /boot/config.txt
First, disable the on-board sound (as it uses hardware that the screens rely on) by looking for the line that says dtparam=audio=on and changing it to off. Also, uncomment the line that says hdmi_force_hotplug=1, to ensure that an HDMI signal is still generated even with no HDMI monitor plugged in. Save and then reboot your Raspberry Pi.
Now run the program using the config you just set:
cd ~/rpi-fb-matrix
sudo ./rpi-fb-matrix matrix.cfg
You should now see the top 64×16 pixels of your Pi’s display represented on your RGB LED panels! This probably consists of the Raspberry Pi icon and the rest of the top portion of the display bar.
No screensaver!
At this point it’s important to ensure that there’s no screensaver or screen blanking enabled on the Pi, as you want this to display all the time. To disable screen blanking, first install the xscreensaver tool:
sudo apt-get install xscreensaver
That will add a screensaver option to the Pi’s GUI menus, allowing you to disable it completely. Finally, you need to tell the Raspberry Pi to do two things each time it loads:
- Run the rpi-fb-matrix program (like we did manually just now)
- Open the web browser in fullscreen (‘kiosk’ mode), pointed to the Social Counter web page
To do so, edit the Pi’s autostart configuration file:
sudo nano ~/.config/lxsession/LXDE-pi/autostart
Insert the following two lines at the end:
@sudo /home/pi/rpi-fb-matrix/rpi-fb-matrix /home/ pi/rpi-fb-matrix/matrix.cfg\
@chromium-browser --kiosk http://localhost/ social-media-counter
Et voilà!
Disconnect any keyboard, monitor, or mouse from the Pi and reboot it one more time. Once it’s started up again, you should have a fully working display cycling through each enabled social network, showing up-to-date follower counts for each.
It’s now time to make a surround to hold all the components together and allow you to wall-mount your display. The styling you go for is up to you — you could even go all out and design and 3D print a custom package.
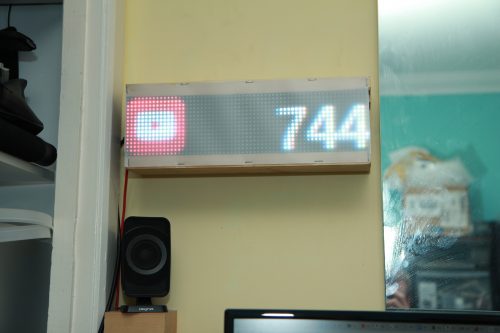
The finished product, in pride of place on the wall of our office. Now I just need some more subscribers…!
For my surround, I went for the more rustic and homemade look, and used some spare bits of wood from an internal door frame lining. This worked really well due to the pre-cut recess. With a plywood back, you can screw everything together so that the wood holds the screens tightly enough to not require any extra fitting or gluing, making for easier future maintenance. To improve the look and readability of the display (as well as soften the light and reduce the brightness), you can use a reflective diffuser from an old broken LED TV if you can lay your hands on one from eBay or a TV repair shop, or just any other bit of translucent material. I found that two layers stapled on worked and looked great. Add some hooks to the back and — Bob’s your uncle — a finished, wall-mounted display!
Phew — that was quite an advanced build, but you now have a sophisticated display that can be used for any number of things and should delight your customers whilst helping to build your social following as well. Don’t forget to tweet us a picture of yours!
Website: LINK